How to Cook Steak Perfectly
Tested in a Real Home Kitchen
Every technique in this guide was tested on a home gas stove using a 10-inch cast iron pan. Results, temperatures, and timings reflect what actually happened — not what should happen in theory.
Most people ruin steak before it hits the pan. They cook cold meat, use a warm pan, and then wonder why there's no crust. I did this for years before I understood what was actually happening at the surface of the meat in those first 30 seconds — and once I understood it, my results changed completely.
Here is what actually happens at each stage, the specific mistakes that cause gray, steamed, overcooked steak, and the exact sequence that produces a crust and a properly cooked center consistently.
What Actually Happens When Steak Hits the Pan
Egg proteins start setting at 145°F. Steak browning starts at 280°F. Those are the numbers that explain everything.
When a wet or cold steak hits a warm pan, the surface temperature drops immediately. The moisture on the steak has to evaporate — and it evaporates at 212°F — before any browning can start. If your pan was only at 350°F to begin with, you're now cooking at 212°F for the first minute or two. That's steaming, not searing. That's the gray band you keep getting.
The fix isn't complicated: you need the pan at 450°F+ before the steak goes in, and the steak surface needs to be completely dry. When those two conditions exist, the Maillard reaction starts in seconds instead of minutes, and you get an actual crust.
Pro Tips
- Always preheat your pan for at least 2 minutes on high before the steak goes in — not medium-high, high.
- Pat the steak completely dry immediately before cooking, even if you dry-brined it overnight.
- Pull the steak 5°F below your target temperature and let carryover cooking cover the gap during rest.
- Use a heavy-bottomed pan — thin pans lose temperature when the cold steak hits them and you lose the crust.
- Rest on a wire rack, not a cutting board — the board traps steam under the steak and softens the crust.
What I Noticed Testing This
I ran the same 1.5-inch ribeye three ways: cold from fridge on a preheated pan, room temperature on a preheated pan, and room temperature on a properly rested dry-brined steak on a fully hot pan. The results were not subtle.
The cold steak produced the widest gray band — the outside was at 145°F before the center hit 90°F. The room-temperature steak was better. The dry-brined, room-temperature steak on a properly preheated cast iron had essentially no gray band — the center went from 70°F to 130°F in roughly the same time the crust formed.
The single biggest variable was pan temperature. Not the cut. Not the grade. Not the salt. The pan temperature when the steak first contacted the metal is what determined everything else.
Step-by-Step
- 1
Choose the Right Cut and Grade
Ribeye is the best all-around steak for pan-searing due to its intramuscular fat (marbling) that bastes the meat from within. USDA Choice or Prime grades have enough fat to stay moist. For leaner cuts like strip or sirloin, dry brining overnight compensates for lower fat content. Avoid steaks under 3/4 inch thick — they overcook before the crust can develop.
- 2
Dry Brine at Least 45 Minutes Before Cooking
Salt draws moisture to the surface via osmosis. In the first 30 minutes that moisture sits wet — bad for searing. After 45 minutes it reabsorbs, carrying salt deep into the protein. For best results, salt generously, place on a wire rack uncovered in the fridge overnight. The fridge air further dries the surface, giving you a crust that forms in seconds when it hits the pan.
- 3
Preheat Your Pan Until Smoking
The single most common home cook mistake: a pan that is not hot enough. Use cast iron or stainless steel — never non-stick. Heat over high for 2-3 minutes until the first wisps of smoke appear. Add a high-smoke-point oil just before the steak goes in. A cold pan means the steak steams instead of sears — the crust cannot form if the surface temperature is below 280°F.
- 4
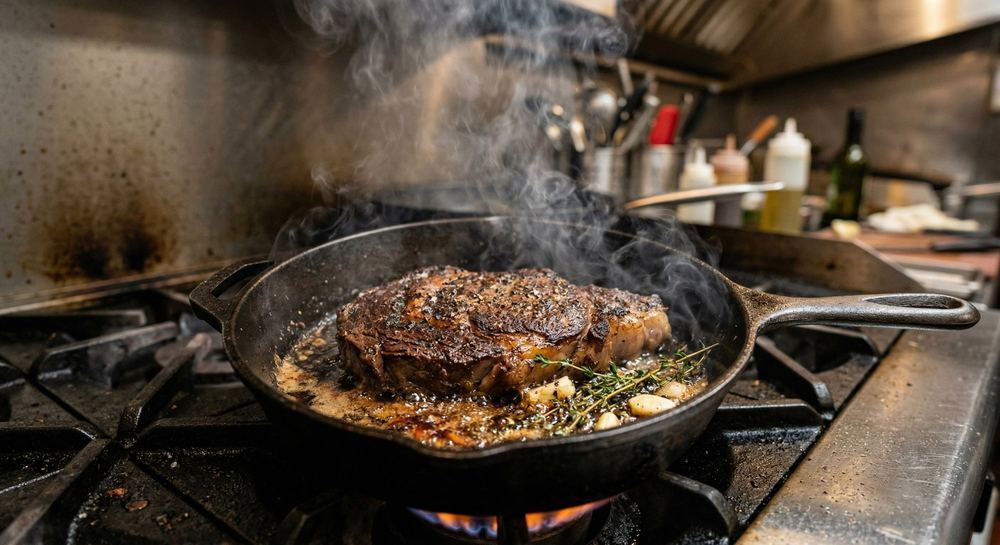
Sear, Baste with Butter, and Flip Once
Place the steak away from you into the hot oiled pan. Do not move it — moving tears the forming crust from the surface. After 2-3 minutes, the steak will release naturally. Flip once. In the final 90 seconds add butter, a crushed garlic clove, and thyme. Tilt the pan and baste continuously with a large spoon. This technique is what separates restaurant steak from home steak.
- 5
Rest 7-10 Minutes Before Cutting
Pull the steak 5 degrees below your target temperature — carryover cooking during the rest raises it the rest of the way. Tent loosely with foil and rest for 7-10 minutes. A steak cut immediately loses 30-35 percent of its juice onto the board. The same steak rested properly loses under 10 percent. The rest is where moisture redistributes — skipping it wastes everything that came before it.
Common Mistakes
The most common mistakes with this technique — and why each one produces a bad result:
- Not drying the surface: Wet steak steams before it sears. The first 30–60 seconds in the pan are wasted evaporating moisture instead of building the Maillard crust. Always pat dry immediately before cooking.
- Pan not hot enough: The most common mistake. If you don't hear an immediate, aggressive sizzle the moment the steak hits the pan, remove the steak and heat the pan longer. A tepid pan means no crust.
- Moving the steak too early: The steak sticks initially because proteins are bonding with the metal. Leave it alone — it will release naturally when the crust is formed. If you force it, the crust tears.
- Cutting before resting: A steak cut immediately after cooking loses 30–35% of its moisture onto the board. A rested steak loses under 10%. The rest period is not optional.
- Cooking straight from the fridge: A cold steak means the outside overcooks before the center reaches temperature. Take steak out 20–30 minutes before cooking.
If Your Steak Always Comes Out Gray — Do This Tomorrow
Salt your steak tonight, leave it uncovered on a rack in the fridge overnight. Tomorrow: take it out 25 minutes before cooking. Preheat your cast iron on high for 3 full minutes. Pat the steak completely dry with paper towels. Then cook it. The difference will be immediately obvious — you'll hear it the moment it hits the pan.
The Realization That Changed Everything
I used to think more butter made better steak. It doesn't — more butter means lower pan temperature because butter burns at a lower temperature than the Maillard reaction requires. The professional technique is oil for the sear, butter added only in the final 90 seconds for basting. That sequence exists for a specific physical reason, and once I understood it, I stopped doing it wrong.
Method Comparison
| Method / Type | Key Difference |
|---|---|
| Cast iron pan | Best heat retention, produces the best crust. Gets extremely hot and stays hot when cold steak hits it. |
| Stainless steel pan | Easier to make pan sauces in — more reactive to heat changes. Requires a bit more oil. |
| Grill | Adds smoke and char. Harder to control doneness. Best for thinner steaks. |
| Oven (reverse sear) | Best for thick steaks (1.5 inch+). Most even doneness from edge to edge. |
Step-by-Step: How to Cook Steak Perfectly
Pro Tip — The 45-Minute Salt Rule
Salt your steak either immediately before cooking, or at least 45 minutes before. In between 1–44 minutes, the drawn-out moisture sits on the surface and steams the steak instead of searing it. Overnight dry-brining in the fridge gives the absolute best crust.
Steak Doneness Temperature Reference
| Doneness Level | Internal Temp (°F) | Internal Temp (°C) | Visual Description |
|---|---|---|---|
| Rare | 120–125°F | 49–52°C | Bright red center, very soft to touch |
| Medium Rare | 130–135°F | 54–57°C | Warm red center, juicy — chef's recommendation |
| Medium | 140–145°F | 60–63°C | Pink center, slightly firmer texture |
| Medium Well | 150–155°F | 65–68°C | Slightly pink, noticeably less juicy |
| Well Done | 160°F+ | 71°C+ | No pink visible, fully cooked through |
Steak Doneness Visual Guide
Steak Doneness Visual Guide
Rare
120–125°F
Med Rare
130–135°F
Medium
140–145°F
Med Well
150–155°F
Well Done
160°F+
Common Mistakes to Avoid
Even experienced cooks make consistent mistakes with this technique. Understanding them upfront saves hours of trial and error:
- Wrong temperature: Cooking at the wrong heat level — usually too low when browning is the goal — is the single most common error.
- Skipping prep steps: Steps like drying the surface, salting in advance, or bringing food to room temperature are easy to skip and dramatically affect the result.
- Guessing instead of measuring: An instant-read thermometer removes all guesswork. Professional kitchens rely on thermometers, not timing, for every protein.
- Rushing the process: Most techniques have non-negotiable waiting periods — rest times, brining windows, reducing steps. Patience is a cooking skill.
Frequently Asked Questions
Medium rare steak should reach 130–135°F (54–57°C) internally. Remove from heat at 128–130°F as carryover cooking during the rest period will bring it to the ideal temperature.
Rest steak for a minimum of 5 minutes for thin cuts and up to 10 minutes for thick steaks over 1.5 inches. The rest allows juices to redistribute. Tent loosely with foil to keep it warm.
Professional chefs typically oil the pan, not the steak. Adding a small amount of high-smoke-point oil to a very hot pan gives better control. For grilling, oiling the steak directly also works.
Steak sticking is almost always a heat issue. The pan needs to be hot enough that the Maillard reaction happens immediately on contact — creating a crust that naturally releases from the surface.
Key Takeaways
- Always dry your steak surface before searing — moisture prevents browning
- Salt at least 45 minutes before cooking, or just before cooking — never in between
- Use a cast iron or stainless steel pan, never nonstick, for proper crust development
- Rest your steak for at least 5 minutes before slicing to retain all the juices