How to Cook Perfect Scrambled Eggs
Tested in a Real Home Kitchen
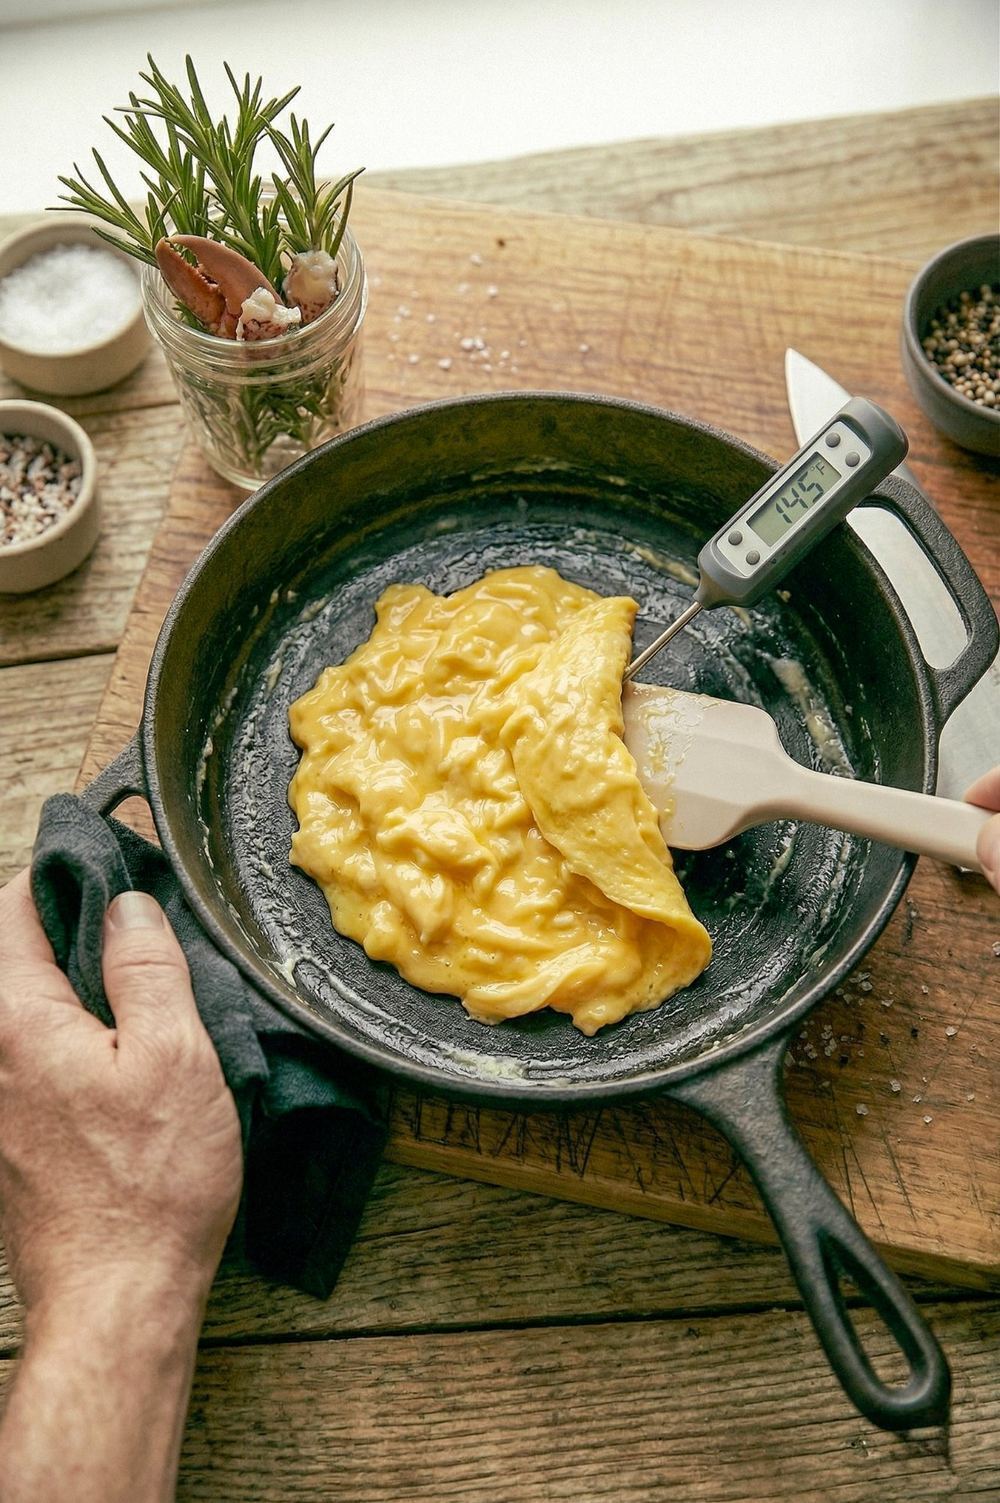
Eggs are the most sensitive protein to heat — every technique here was tested at different heat levels with a thermometer in the pan to confirm what actually happens at each temperature.
I used to cook scrambled eggs the wrong way for years. High heat, quick scramble, done in 90 seconds. They were always dry, slightly rubbery, and inconsistent — sometimes wet, sometimes overcooked, rarely in between.
The switch that changed everything was embarrassingly simple: low heat and patience. Egg proteins coagulate at 145–158°F. I was cooking them at 400°F+. No wonder they went from wet to rubbery in seconds. Here's the technique that actually produces the silky, restaurant-style result.
What Happens to Eggs Between 145°F and 158°F
Egg whites begin coagulating at 145°F and are fully set by 158°F. Yolks begin at 149°F and fully set at 158°F. The window between just-right and overcooked is 13°F for whites — which is why eggs cooked on high heat go wrong so fast. At 400°F, a thin pan surface transmits heat fast enough to push through that entire window in seconds.
Cooking scrambled eggs on low heat gives you control over this window. You can watch the coagulation happen slowly, fold gently to build curds, and pull exactly when the texture is right — because the pan isn't adding 40°F every 10 seconds the way it would on high heat.
The additional benefit of low heat: butter. Butter burns at around 300°F and has a distinct bitter flavor when it does. On low heat, butter maintains its full flavor and acts as the cooking medium that gently conducts heat to the eggs without scorching.
Pro Tips
- Use the lowest burner setting you have for scrambled eggs — less heat than you think you need.
- Pull scrambled eggs off heat when they look 70% done — residual heat finishes them.
- A cold knob of butter folded in at the end adds gloss and stops the cooking instantly.
- For fried eggs, a thin layer of water and a lid in the last 30 seconds sets the white without flipping.
- Never cook eggs in a scorching-hot pan — medium-low is the maximum for most egg preparations.
What Actually Changed When I Switched Methods
I cooked two batches back to back: one on medium-high (my old method), one on the lowest setting on my burner. The medium-high batch took 2 minutes and produced 6 people's worth of rubbery, slightly watery eggs. The low-heat batch took 6 minutes and produced eggs I actually wanted to eat.
The texture difference is hard to overstate. Low-heat scrambled eggs have a glossy, custard-like quality. High-heat scrambled eggs look fine but feel dry and slightly grainy on the tongue. The difference isn't subtle — it's the difference between a $6 diner scramble and a $24 hotel brunch plate.
The most surprising finding: adding a small knob of cold butter in the last 30 seconds (off the heat) made a bigger difference than I expected. It stops the cooking immediately, adds gloss, and makes the eggs taste richer than the same amount of butter used at the start.
Step-by-Step
- 1
Low and Slow — Heat Is Everything
The difference between rubbery scrambled eggs and silky creamy ones is entirely a function of heat. High heat causes egg proteins to coagulate rapidly and squeeze out water — producing a grainy, weeping texture. Low heat allows proteins to coagulate gradually into soft, tender curds. Use your lowest burner setting or periodically lift the pan off the heat. The ideal scrambled egg temperature is around 145-150 degrees F.
- 2
Salt Timing — The Science
Salting eggs before cooking breaks down the protein structure partially, resulting in a smoother, more homogenous texture. Salting after preserves more distinct curds. If salting before, add it 1-2 minutes before cooking and whisk well. Do not salt and let sit for more than 5 minutes before cooking or the eggs become watery. Pepper always goes in after — in a hot pan, pepper can turn bitter.
- 3
Butter, Not Oil
Butter contains milk proteins and water in addition to fat. As it heats, the water evaporates and the milk proteins begin to brown — creating flavor that pure oil cannot replicate. Use unsalted butter over medium-low heat and let it foam and then quiet before the eggs go in. Have a second knob of cold butter to fold in at the end — this emulsifies into the eggs and adds gloss and creaminess.
- 4
The Fold, Not the Scramble
Stop thinking of scrambled eggs as something you stir constantly. The technique is a gentle fold: use a rubber spatula to push the cooked edges toward the center and tilt the pan so uncooked egg flows to the edges. Repeat every 10-15 seconds. You are building soft folds of egg, not breaking them into small pieces.
- 5
Pull Before They Look Done
When scrambled eggs look 70 percent done — still wet-looking, still moving — remove the pan from heat and fold in a small knob of cold butter. The residual heat in the pan and the eggs themselves will continue cooking for another 60-90 seconds. If you wait until they look done on the heat, they will be overcooked by the time they reach the plate.
Common Mistakes
The most common mistakes with this technique — and why each one produces a bad result:
- Too much heat: The most common egg cooking mistake. Egg proteins coagulate at 145–158°F — cooking at 400°F produces rubbery, overcooked eggs in seconds.
- Not pulling early enough: Scrambled eggs should come off heat when they look 70% done. Residual heat finishes them.
- Stirring constantly: Constant stirring produces very small, broken curds. Fold gently every 10–15 seconds instead.
- Skipping the butter finish: A cold knob of butter folded in at the end stops the cooking, adds gloss, and adds flavor.
- Salting too late: Salt before cooking for creamier texture — it breaks down proteins slightly, producing a smoother result.
The One Change That Fixes 80% of Scrambled Egg Problems
Turn your burner to the lowest setting it has. Not medium-low — the actual lowest. Let the pan warm for 60 seconds. Add butter. When it melts without sizzling, add eggs. Fold every 15 seconds. Pull when the eggs look 70% done. Fold in a small knob of cold butter off the heat. Wait 30 seconds. Plate. That sequence alone will produce a result you haven't been getting at high heat.
Why I Salt Before Cooking (And What Happened When I Tested It)
Salting scrambled eggs before cooking breaks down some of the protein network before heat is applied, producing a smoother, more homogenous texture when cooked. I was skeptical. I tested salted-before and salted-after batches at 5-minute and 15-minute pre-salt intervals. The 15-minute pre-salted batch was noticeably smoother and more uniform. The after-salt batch had more distinct curds. Both are good. But they're different — and now I choose based on which texture I want, rather than just adding salt at the end by default.
Method Comparison
| Method / Type | Key Difference |
|---|---|
| Cast iron | Retains heat well — lower setting needed to avoid overcooking. Best for fried eggs. |
| Nonstick | Easiest release. Ideal for scrambled eggs and omelets. Never use high heat. |
| Stainless steel | Works with butter and medium-low heat. Slightly more stick than nonstick but better browning. |
Step-by-Step: How to Cook Perfect Scrambled Eggs
Pro Tip — Pull Scrambled Eggs Off Heat Early
Scrambled eggs continue cooking from residual heat for 30–60 seconds after you remove the pan from the burner. Pull them when they look 70% done — they'll reach perfect consistency by the time they hit the plate. This is the single biggest scrambled egg improvement you can make.
Egg Cooking Method Quick Reference
| Cooking Method | Heat Level | Time (approx) | Key Technique Note |
|---|---|---|---|
| Scrambled (soft) | Low | 3–4 min | Remove from heat while still slightly wet |
| Scrambled (firm) | Medium-low | 5–6 min | Stir continuously for fine curds |
| Fried (sunny side) | Medium | 3–4 min | Cover pan last 30 sec to set white |
| Fried (over easy) | Medium | 3–4 min | Flip gently, 15-second second side |
| Poached | Gentle simmer | 3–4 min | Vinegar in water helps whites cohere |
| Soft boiled | Boil → simmer | 6–7 min | Ice bath immediately after cooking |
| Hard boiled | Boil → simmer | 11–13 min | Ice bath stops cooking and eases peeling |
| French omelet | Medium-high | 90 sec | Constant agitation, then stop and roll |
Common Mistakes to Avoid
Even experienced cooks make consistent mistakes with this technique. Understanding them upfront saves hours of trial and error:
- Wrong temperature: Cooking at the wrong heat level — usually too low when browning is the goal — is the single most common error.
- Skipping prep steps: Steps like drying the surface, salting in advance, or bringing food to room temperature are easy to skip and dramatically affect the result.
- Guessing instead of measuring: An instant-read thermometer removes all guesswork. Professional kitchens rely on thermometers, not timing, for every protein.
- Rushing the process: Most techniques have non-negotiable waiting periods — rest times, brining windows, reducing steps. Patience is a cooking skill.
Key Takeaways
- Most home cooks use too much heat for eggs — lower than you think
- Pull scrambled eggs from heat while still slightly undercooked — residual heat finishes them
- Room-temperature eggs cook more evenly than cold eggs from the refrigerator
- The right fat in a properly heated pan is all you need to prevent sticking